Run cosmon as a remote service
Goal: run a cosmon service on a remote GPU box and drive it from your own
machine with cosmon-remote. This is useful for an invited-guest host: a
machine you operate but may not own, where you have no root access and cannot
use Docker.
The client never needs an interactive shell on the service host. It talks to
one HTTP entry point (the fente); an SSH tunnel is only an L0 transport that
makes that entry point local to the client. Configure ProxyJump in your SSH
config if <remote> is behind a bastion.
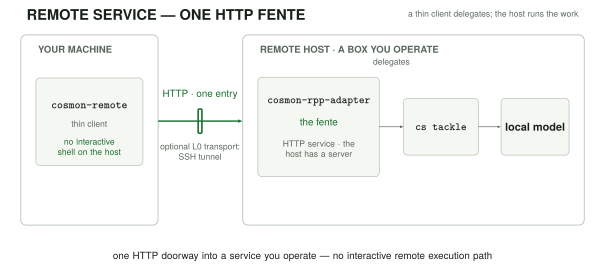
This guide uses a demo identity provider so that the complete auth path is reproducible. Replace it with your production issuer before exposing the service beyond a private tunnel. For how this service surface relates to the runtime, see Control plane vs data plane.
What to deploy
The public noogram/cosmon product closure contains both service components:
| Crate | Role | License |
|---|---|---|
cosmon-rpp-adapter | The HTTP fente and /v1/... service surface. | AGPL-3.0-only |
cosmon-remote | Thin client that drives the service. | AGPL-3.0-only |
The two host-side binaries, cosmon-rpp-adapter (the fente) and cs-oidc-mock
(the demo IdP used in Step 2), ship as a signed cosmon-service-<version>-<target>.tar.gz
release asset per target, alongside the cs CLI tarball. Step 1 therefore has
two routes: download the signed release bundle (no Rust toolchain required),
or build from source. Prefer the download route unless you need an unreleased
revision.
The client, cosmon-remote, is a laptop tool, so it ships with cs: the
cosmon-<version>-<target>.tar.gz release tarball carries both, and the
one-liner installer (curl -fsSL https://noogram.org/cosmon/install.sh | sh)
and the Homebrew formula each place cs and cosmon-remote together. If you
installed cs, you already have the connector. There is no separate client
fetch. The steps below cover only the host. Run the cosmon-remote commands
from Step 4 on the machine where you installed cs.
Remote harvest has two explicit profiles. Scoped lets a binding-granted
cosmon:molecule:harvest credential close and merge ordinary work. Sealed
also requires an independently signed grant installed for that molecule or
mission. Neither profile is selected by an upgrade. See the
remote harvest contract for the
policy table and typed refusals.
The service dispatches work through the same tackle logic as cs tackle, in
process, and it does not spawn a cs binary; it is not a second scheduler. On
the host, the service resolves the selected worker adapter by the same chain as
cs tackle. For this setup it uses the
built-in local adapter: an in-process Ollama /v1 client. No Node.js,
Claude runtime, or tmux session is required for that worker leg.
Step 1: Get the binaries and prepare the remote galaxy
You need three binaries on the host: cosmon-rpp-adapter, cs-oidc-mock, and a
compatible cs. Get them the signed-release way (no toolchain) or build them
from source.
First, make the target directory on the host. This guide calls it $COSMON_HOME.
ssh <remote> "mkdir -p '$COSMON_HOME/bin' '$COSMON_HOME/state/security' '$COSMON_HOME/galaxies'"
Route A: download the signed release bundle (recommended)
Each release ships a cosmon-service-<version>-<target>.tar.gz (the fente + demo
IdP) next to the cs CLI tarball. Pick the target matching the host. A static
Linux box uses x86_64-unknown-linux-musl or aarch64-unknown-linux-musl. Both
tarballs are cosign-signed and Rekor-anchored; verify them as in
Verify the binary's provenance.
ver=0.1.0
target=x86_64-unknown-linux-musl
base="https://github.com/noogram/cosmon/releases/download/v${ver}"
curl -fsSLO "${base}/cosmon-service-${ver}-${target}.tar.gz"   # cosmon-rpp-adapter + cs-oidc-mock
curl -fsSLO "${base}/cosmon-${ver}-${target}.tar.gz"           # cs
tar xzf "cosmon-service-${ver}-${target}.tar.gz"
tar xzf "cosmon-${ver}-${target}.tar.gz"
scp cosmon-rpp-adapter cs-oidc-mock cs <remote>:$COSMON_HOME/bin/
Route B: build from source
Build a static musl release on your development machine. cargo-zigbuild uses
Zig as the cross-linker, so this works without a Linux container. Install its
prerequisites first (Rust's musl target, Zig, and cargo-zigbuild).
cd /path/to/cosmon
cargo zigbuild --release --target x86_64-unknown-linux-musl \
  -p cosmon-rpp-adapter --bin cosmon-rpp-adapter
cargo zigbuild --release --target x86_64-unknown-linux-musl \
  -p cosmon-oidc-testkit --bin cs-oidc-mock
Copy the resulting binaries, plus a compatible cs binary, to $COSMON_HOME/bin.
scp target/x86_64-unknown-linux-musl/release/cosmon-rpp-adapter \
    target/x86_64-unknown-linux-musl/release/cs-oidc-mock \
    /path/to/compatible/cs <remote>:$COSMON_HOME/bin/
Install or configure Ollama on the remote host and make a model that fits its
VRAM available. Initialise the demo galaxy and select the local adapter so
cs tackle selects Ollama rather than an external coding-agent adapter:
ssh <remote> '
  "$COSMON_HOME/bin/cs" init "$COSMON_HOME/galaxies/demo" --tenant demo
  cat >> "$COSMON_HOME/galaxies/demo/.cosmon/config.toml" <<'"'"'EOF'"'"'

[adapters]
default = "local"

[adapters.local]
default_model = "<your-model>"
EOF
'
Step 2: Start the demo identity provider and pin its keys
cs-oidc-mock is a small demo IdP. Its defaults are issuer
https://idp.test.cosmon-oidc-testkit, audience cosmon-rpp-test, a
10-minute token lifetime, and bind address 0.0.0.0:8444. This guide binds it
to loopback on port 8444, writes its JWKS, and uses its POST /issue route to
mint signed test tokens:
ssh <remote> '
  $COSMON_HOME/bin/cs-oidc-mock \
    --bind 127.0.0.1:8444 \
    --write-jwks-out $COSMON_HOME/state/security/jwks/idp.json
'
In a second remote shell, declare the matching issuer and render the demo identity's binding. The issuer, audience, and subject must agree with the token minted below:
ssh <remote> '
  cat > "$COSMON_HOME/state/security/trusted-issuers.toml" <<'"'"'EOF'"'"'
[[issuer]]
iss = "https://idp.test.cosmon-oidc-testkit"
jwks_uri = "http://127.0.0.1:8444/jwks.json"
audiences = ["cosmon-rpp-test"]
EOF

  mkdir -p "$COSMON_HOME/state/nucleons/demo"
  "$COSMON_HOME/bin/cosmon-rpp-adapter" nucleon render \
    --noyau demo --sub demo-operator \
    --iss https://idp.test.cosmon-oidc-testkit --aud cosmon-rpp-test \
    --scope cosmon:molecule:read --scope cosmon:molecule:write \
    --scope cosmon:molecule:harvest \
    > "$COSMON_HOME/state/nucleons/demo/oidc-identity.toml"
'
The trusted issuer and this nucleon binding are both required: a valid token
alone does not grant access to a tenant. With trusted-issuers.toml present,
the adapter fetches keys from each configured jwks_uri. It can also read a
staged security/jwks/*.json file for an issuer listed there. Any staged file
whose iss is absent from the list is refused with a warning at startup and
on every SIGHUP reload. Removing an issuer entry revokes its staged keys on
reload even if the file remains on disk. An existing empty allowlist denies
every issuer; remove the allowlist file only when intentionally returning to
the legacy file-stage fallback.
Binding files are operator-controlled configuration. The adapter does not
keep an independent hash of them. An edit to an existing binding takes effect
after SIGHUP or restart. Keep the state directory writable only by the
operator and review binding edits before reloading. If two binding files
declare the same (issuer, subject, audience) triple, startup refuses the
map; on SIGHUP, the adapter logs duplicate binding refused and keeps the
previous live map. Remove the duplicate and reload again.
In HTTP-fetch mode, send SIGHUP after every edit to
trusted-issuers.toml. The adapter applies issuer additions and removals,
audience changes, and jwks_uri changes, then immediately fetches the current
issuer set. Removed audiences stop validating as soon as the reload is
applied. A new issuer or changed key location needs a successful fetch before
its tokens validate. If a fetch fails, keys already fetched from an unchanged
location remain available; a changed location does not keep keys from the old
location. The adapter logs configuration changes and any fetch failure. Fix an
invalid allowlist file and send SIGHUP again; an invalid file leaves the
prior live configuration in place.
For a production deployment, configure the issuer's jwks_uri in
trusted-issuers.toml and keep the issuer and binding rules explicit.
The adapter checks token times against its own clock. It rejects a token whose
iat or optional nbf is more than 30 seconds in the future. In active
posture, both the declared exp - iat lifetime and the remaining exp - now
time must be at most 15 minutes. In prepared posture, a lifetime or remaining
time over 24 hours is logged as a warning; future iat and nbf values still
cause rejection. Issuers that mint tokens ahead of the adapter clock or issue
longer lived tokens may now receive not_yet_valid or expired refusals.
Synchronize the issuer and adapter clocks and use the posture's token lifetime.
Open /v1/events and /v1/molecules/{id}/logs streams now close when their
bearer expires. They also recheck the live issuer and binding projections,
scope, and deny policy every second and before sending each item. A removed
issuer or binding takes effect on the next recheck after a successful reload;
global_kill and subject, token, or tenant denies take effect within 31 seconds
of an operator file edit (the deny cache refreshes every 30 seconds). The
adapter logs rpp.sse.admission_ended with the route and a broad reason when
it closes an open stream. Clients should reconnect with a current credential
after authorization is restored. A disconnected stream is not resumed by a
later policy change.
Step 3: Start the fente on loopback
The adapter reads state/security/oidc-kill.toml and
state/security/oidc-policy.toml at startup and refreshes them at most 30 s
after a change. Both files are optional. If either file exists but cannot be
read or parsed, the adapter logs an error naming the file and refuses all
tenant admission with global_kill (HTTP 503). This also applies after a
refresh, even if the previous contents were valid. Repair or remove the bad
file; the next refresh restores admission from both files. A misspelled field
in the kill switch or policy structure is an error, so check the adapter log
after changing either file.
OIDC secondary controls use the issuer and subject together. Discovery at
GET /v1/noyaux lists only bindings matching the token's issuer, subject and
audience. Rate limits and GET /v1/quota use an issuer-scoped bucket; after
upgrading, existing subject-only bucket files are no longer consulted and
each principal starts with a fresh bucket. The adapter logs this change at
startup. Audit identity digests also change to the issuer-scoped form.
For a targeted revocation, add issuer to a [[deny.sub]] entry and keep
sub_hash as the BLAKE3 hex digest of the subject alone. For example,
issuer = "https://idp.example" with sub_hash = "<blake3-of-sub>" denies
only that issuer's subject. A [[deny.jti]] entry can likewise specify
issuer and sub_hash alongside jti to target that principal's token.
Existing entries without issuer remain valid and continue to deny every
issuer with the matching subject digest or token ID. Keep those entries when
the broad revocation is intentional; add issuer to narrow them. The adapter
warns when it loads unscoped entries. A sub_hash on a [[deny.jti]] entry
requires issuer; a malformed policy closes admission until repaired.
Start cosmon-rpp-adapter with its state directory, tenant configuration, and
the loopback address that the tunnel will reach. Keep this process supervised
by the service manager available to the host.
ssh <remote> '
  $COSMON_HOME/bin/cosmon-rpp-adapter \
    --bind 127.0.0.1:8443 \
    --config $COSMON_HOME/rpp.toml
'
The rpp.toml config declares the state directory, the tenant galaxies root, and
the directory for tenant artifacts. For example:
bind_addr = "127.0.0.1:8443"
state_dir = "/opt/cosmon/state"
galaxies_root = "/opt/cosmon/galaxies"
artifact_root = "/opt/cosmon/artifacts"
The service is deliberately loopback-only here. The tunnel is the sole L0 path to its HTTP surface; the client does not use a direct shell or container-exec path to create, tackle, or fetch work.
For the harvest administration commands below, give the adapter a separate
host-controlled admin credential at boot. On the operator machine, prepare a
file with umask 077; openssl rand -hex 32 > "$HOME/.config/cosmon/harvest-admin.token"
after creating that directory, then install the same bytes as a mode-0600
secret file on the host. Set COSMON_ADMIN_TOKEN_FILE to that host file's
absolute path in the adapter's supervised environment and restart the adapter.
Use the operator-side file with --admin-token-file; never put the credential
in a tenant bearer, a URL, or a tracked config file. An absent or unreadable
host secret leaves the admin route closed (admin_disabled).
For the example /opt/cosmon layout in rpp.toml, the provisioning step is:
mkdir -p "$HOME/.config/cosmon"
umask 077
openssl rand -hex 32 > "$HOME/.config/cosmon/harvest-admin.token"
scp "$HOME/.config/cosmon/harvest-admin.token" \
  <remote>:/opt/cosmon/state/security/harvest-admin.token
ssh <remote> 'chmod 600 /opt/cosmon/state/security/harvest-admin.token'
# Set COSMON_ADMIN_TOKEN_FILE=/opt/cosmon/state/security/harvest-admin.token
# in the adapter service manager, then restart the adapter.
Step 4: Open the tunnel, mint a demo token, and create a client profile
On the client machine, open a tunnel. It maps the remote service's loopback port to a local port. The mock remains loopback-only on the remote host, so mint its short-lived token server-side and pass it to the client; this avoids needing a second IdP tunnel:
ssh -f -N -L 127.0.0.1:8443:127.0.0.1:8443 <remote>

TOKEN=$(ssh <remote> '
  curl --fail --silent --show-error -X POST \
    "http://127.0.0.1:8444/issue?sub=demo-operator&aud=cosmon-rpp-test&scopes=cosmon:molecule:read,cosmon:molecule:write" \
    | jq -r .access_token
')
export COSMON_REMOTE_TOKEN="$TOKEN"
cosmon-remote stores a default profile and one profile file per service.
Resolution is --profile first, then
$COSMON_REMOTE_PROFILE, then the configured default.
Create the profile manually (or use the service's install.sh profile
installer when your deployment provides one). oidc-url remains required by a
profile. The pre-minted token means this client does not need to reach it:
cosmon-remote config init demo http://127.0.0.1:8443
cosmon-remote config set host http://127.0.0.1:8443
cosmon-remote config set sub demo-operator
cosmon-remote config set aud cosmon-rpp-test
cosmon-remote config set oidc-url http://127.0.0.1:8444
cosmon-remote config set issuer https://idp.test.cosmon-oidc-testkit
cosmon-remote config set client-id cosmon-rpp-test
cosmon-remote config set noyau demo
cosmon-remote config set timeout 30
cosmon-remote config set artifacts-dir ./cosmon-artifacts
cosmon-remote config set phone-home off
Verify both liveness and the identity that the service resolved:
cosmon-remote healthz
cosmon-remote auth me
Provision remote harvest
First grant cosmon:molecule:harvest in the binding for this exact issuer,
subject and audience. Add it to the --scope list in Step 2 when rendering
a new binding, or to the existing binding's [scopes].allowed list and reload
the adapter. A token claiming the scope cannot supply it when the binding
omits it. For the demo issuer, mint a fresh token with that scope as well; the
token's write scope by itself cannot authorize either explicit profile.
Keep read for status and other observations, write for nucleation and
ordinary mutations, and add cosmon:worker:spawn only when dispatch or
auto-propel is intended. A binding reload does not add harvest to existing
bindings automatically.
For the demo identity in Step 4, after updating and reloading its binding, replace the exported token with one that includes the new scope:
TOKEN=$(ssh <remote> '
  curl --fail --silent --show-error -X POST \
    "http://127.0.0.1:8444/issue?sub=demo-operator&aud=cosmon-rpp-test&scopes=cosmon:molecule:read,cosmon:molecule:write,cosmon:molecule:harvest" \
    | jq -r .access_token
')
export COSMON_REMOTE_TOKEN="$TOKEN"
On a freshly provisioned galaxy with [harvest_authority] required absent or
false, select the scoped profile from the operator machine. The
policy fragment
shows the corresponding explicit galaxy setting; the command makes the
compare-and-set administrative write:
cosmon-remote harvest configure --policy scoped \
  --admin-token-file "$HOME/.config/cosmon/harvest-admin.token"
cosmon-remote harvest status --json
cosmon-remote molecule done <completed-molecule-id> \
  --reason "reviewed for remote integration" --json
Check policy: scoped, provenance: explicit, and merged: true in the
responses, then inspect the tenant base branch for the merge. The dedicated
harvest scope alone does not grant write or spawn. If local
[harvest_authority] required = true, selecting scoped refuses
harvest_policy_conflict; resolve that local policy deliberately before
trying again. Do not erase required as an automatic upgrade step.
For a sealed profile, install the external minisign executable on the
operator machine, then use the same admin credential to install only its
public root. init generates an encrypted private key under
$XDG_CONFIG_HOME/cosmon/harvest/keys/<profile>/ (or the corresponding
~/.config directory) and prompts for its password locally. Keep that
directory outside service and worker mounts. A profile with
required = true may select sealed without weakening its local seal policy.
cosmon-remote harvest init \
  --admin-token-file "$HOME/.config/cosmon/harvest-admin.token"
cosmon-remote harvest status --json
cosmon-remote harvest grant --molecule <completed-molecule-id> --expires-in 1h
cosmon-remote harvest status --molecule <completed-molecule-id> --json
cosmon-remote molecule done <completed-molecule-id> \
  --reason "reviewed sealed integration" --json
grant fetches current facts, checks the canonical challenge locally,
displays the grant for review, asks the external signer to sign on this
device, and uploads the signed result. Installation does not merge; done
performs the synchronous transaction. A mission grant uses
--mission <root-molecule-id> instead of --molecule; it applies only to
members of that mission under the signed policy. For offline issuance, run
grant --molecule <id> --export <challenge.json> on a connected client,
grant --sign <challenge.json> on the signing device, then
grant --import <challenge.json.signed.json> on a connected client. The
export, sign and import modes are exclusive.
Grants expire after one hour by default; use --expires-in to choose minutes,
hours or days, or deliberately use --no-expiry until the epoch changes.
On expiry or changed facts, inspect harvest status --molecule and issue a
fresh grant. To revoke all existing grants without replacing the key, a local
operator in the tenant galaxy can run
cs harvest-authority configure --policy sealed --epoch <current-epoch-plus-one>;
the epoch must increase. harvest configure --policy disabled stops remote
harvest immediately, but restoring the old root and epoch could make an
unexpired grant usable again, so bump the epoch before re-enabling it. To
rotate the public root, read the current
key_fingerprint from status and run harvest init --rotate-from <fingerprint>;
the operator device signs the tenant, old and new root digests, and next epoch
with the current private key before uploading the new public root. If that key
is outside the default directory, pass --current-key-file <old-key>;
--key-file <new-key> selects the replacement. The compare-and-set increments
the epoch and invalidates older grants. A
second init with the same key is idempotent. Protect the old private key
according to your retention policy; never copy it into the service.
If the current private key is lost, API rotation cannot proceed. On the server
host, run cs harvest-authority configure --policy sealed --public-key-file <new-public-key> --epoch <current-epoch-plus-one> --local-reset. Local recovery
writes an append-only intent to .cosmon/harvest-root-resets.log before
replacing authority files. Review that record and the resulting root and epoch;
the HTTP admin route has no local reset option.
An explicitly configured cs binary executor cannot perform an explicit
remote harvest: done returns harvest_effect_unsupported. Remove that
binary selection to use the linked library effect. On explicit profiles,
--force, --skip-pre-done-hook and --deploy-off-trunk are refused
harvest_override_requires_ratification; reserved work is also refused.
Use operator review and the local workflow for those cases. A 200 with
merged: false is a valid no-merge or no-op outcome; it is not evidence of
integration. A recovery refusal (harvest_recovery_required) requires
inspection of the durable journal and Git state, never receipt deletion.
Existing galaxies with no remote setting retain their prior behavior:
required = false remains disabled, while required = true keeps the legacy
write-plus-seal path. harvest status reports provenance: legacy. No restart,
upgrade or binding reload chooses scoped or changes an existing binding.
Signing in from inside a container
cosmon-remote login runs the browser half of the OAuth flow: it opens a
one-shot listener for the redirect, sends you to the identity provider, and
catches the ?code=… the browser is bounced back with. By default that
listener binds 127.0.0.1:7777. The URL registered with the provider, which is
the one the browser is told to come back to, is http://127.0.0.1:7777/callback.
On a laptop the two are the same machine and there is nothing to arrange.
Inside a container or a VM they are not the same machine. The browser is on
your desktop; cosmon-remote is in the box. The browser dials its own
127.0.0.1:7777 and the redirect never crosses the boundary. The fix depends
on how the box is reached:
# SSH into a VM: the tunnel's far end is opened on the VM's OWN loopback, so
# the default bind already answers there — no --bind needed.
ssh -L 7777:localhost:7777 you@the-vm
cosmon-remote login

# A container reached by a PUBLISHED port is different: sshd is not in the
# loop, so the port lands on the container's external interface, not its
# loopback. Publish the port at run time and bind the listener to match:
docker run -p 127.0.0.1:7777:7777 … your-image
cosmon-remote login --bind 0.0.0.0
--bind moves the listener only. The advertised redirect_uri stays
http://127.0.0.1:7777/callback. It is registered with the provider by exact
match, so changing it would simply be rejected, and it is the address your
browser must dial for the forward to pick the redirect up. The port is not
part of the flag, and it is not stored anywhere either: the listener's port is
read out of the advertised redirect_uri at the moment of binding, so the two
have no way to disagree about it.
A non-loopback bind is announced on stderr, once, before the browser opens. It
widens who can connect to the catcher for the length of one login. What
bounds that: only a request echoing this flow's high-entropy state can end
the wait. Everything else is answered 404 and discarded. A captured code is
useless without the PKCE verifier, which never leaves the process.
Prefer forwarding from 127.0.0.1 on the desktop side (as above) so the
forwarded port is not itself exposed to the desktop's network.
Step 5: Drive the measured golden path
From the thin client, create a molecule, dispatch it, wait for its detached worker to finish, and retrieve its artifact:
cosmon-remote do --yes "write a Rust function that returns the nth Fibonacci number"
cosmon-remote artifact list <molecule-id>
cosmon-remote artifact get <molecule-id> <artifact-token> --out ./result.md
The do gesture nucleates, tackles, follows the molecule to a terminal status,
and then closes it with a harvest. The close is best-effort: a refused harvest
leaves the deliverable where it was and reports the reason. Pass --no-close
to skip it, or --close-reason to supply the harvest reason. tackle returns a
worker session promptly while the local Ollama worker runs detached on the
remote host. The successful path is:
thin client -> tunnel -> fente -> in-process tackle -> local Ollama worker
             <- artifact get <- completed molecule <- detached worker
This confirms the full service contract: a profile-authenticated thin client
creates work over the tunnel, the remote service dispatches the local adapter,
the molecule reaches completed, and the client receives the resulting
artifact without an interactive remote execution path.
Addressing artifacts
artifact list prints opaque artifact tokens such as art_...; use the token,
not a server path, with artifact get <molecule-id> <artifact-token>. During
the tackle, the adapter creates <artifact_root>/<noyau>/<molecule-id>/ and
exports that directory as $COSMON_ARTIFACT_DIR to the worker. The client
fetches bytes with --out; when omitted, it writes under
./cosmon-artifacts/<molecule-id>/<artifact-token>.
Troubleshooting and security
A 503 tackle_unavailable arrives bare: the client prints the status, the
label, and the request_id, and no probable cause. That is deliberate. The
label is a catch-all. The adapter collapses every dispatch failure it has no
named label for onto it (for example a local-adapter backend that is
unreachable), so a cause printed here would
be a guess, and a guess that names the wrong one sends the investigation the
wrong way. Diagnose it instead with cosmon-remote doctor, which checks each
of those and reports what it found. On a sovereign local-adapter host in
particular, this 503 does not imply a missing Claude Code install: the local
Ollama path does not require one. An empty artifact list normally means
the worker has not written its deliverable or has not completed yet. A 401 or
403 from auth me means to compare the token's issuer, subject, audience, and
scopes with trusted-issuers.toml and the rendered nucleon binding.
Security: the local worker is sandboxed for untrusted work: it receives a six-tool, shell-free registry rather than host-shell access; a toolchain preflight runs before work; and each molecule has a wall-clock limit. It cannot use that worker interface to scan the host or read outside its worktree.
Smoke the whole stack locally before you trust it
Everything above is a sequence of gestures you perform once, by hand, and then have to believe about your next deployment. One command re-performs the whole thing against real containers and tells you which step broke:
python3 -m venv .venv && . .venv/bin/activate
pip install -r tests/e2e/requirements.txt
bash scripts/rpp-remote-e2e.sh
The suite lives in tests/e2e/ and is driven by pytest; the shell entry point
is a pass-through that forwards every argument, so the whole runner is available
from it:
bash scripts/rpp-remote-e2e.sh -k healthz     # one test, alone
bash scripts/rpp-remote-e2e.sh -x --pdb       # stop at the first red, break in
bash scripts/rpp-remote-e2e.sh --junitxml=e2e.xml
pytest tests/e2e -m "not stack"               # the parts needing no docker
It builds both images from crates/cosmon-rpp-adapter/deploy/docker-compose.yml,
waits on the two healthchecks that file already declares, and then drives the
stack with the compiled cosmon-remote binary over the published loopback
ports: login (the real authorization-code + PKCE flow against the mock IdP,
headless), auth me, nucleate, observe, tackle (a real worker, spawned by
the image), a wait for that worker to drive the molecule to completed, and a
done that must come back having merged the worker's branch onto the tenant
base branch.
Every assertion says why the value it expects is the right one, naming the ADR
section, route document or invariant it derives from; when one breaks, the
failure prints that sentence together with the request as sent, the response as
received and the tail of the adapter's own log. Each exchange is also written to
.rpp-remote-e2e/<stamp>/artifacts/ as its own file, beside the familiar
one-line-per-step e2e.ndjson.
The stack is reinitialised between test sets. Each test class gets
down -v + up --wait + reprovisioning, and a fresh tenant galaxy tree. No
molecule, inbox entry, or rate-limiter bucket from one set can make the next one
pass or fail. tests/e2e/test_reinit.py is the proof rather than the promise: it
plants a molecule in one set and asserts its absence in the next, and it goes red
under RPP_E2E_REINIT=0.
Nothing of yours is touched. The tracked deploy/ tree is copied and remains
unmodified; the nucleon binding is materialised into the copy from the tracked
.example, so a template that has lost a key the loader reads turns the suite
red instead of passing on a private copy you will never have; the tenant galaxy
is a throwaway tree destroyed with the stack; $HOME is redirected so the run
reads neither your cosmon-remote profiles nor your OS keychain; the containers
carry a name suffix and non-default ports so a live deployment on 8443/8444 keeps
running beside it. Set RPP_E2E_KEEP=1 to leave the stack up and poke at it.
If docker or pytest is missing the run exits 2 and says so. There is no skip
path, on purpose: a smoke that prints green without running is how an absent
prerequisite becomes a passing nightly. Exit 1 is a red test: "ran and failed"
and "could not run" are different verdicts.
What the mock IdP does and does not prove
The login flow runs against cs-oidc-mock, a mock. It proves the shape of the
flow: discovery, an authorization-code redirect, PKCE-S256 on the token
exchange, a signed JWT whose (iss, sub, aud) the adapter resolves against your
nucleon binding. It proves nothing that depends on a real provider's policy, and
it is known to deviate from one in these ways (the list is kept beside the
fixture, in tests/e2e/conftest.py):
/authorizeauto-approves: no login form, no consent, no MFA, so no redirect chain, session cookie or interactive timeout is exercised.subis a fixed, readable string. A real IdP mints an opaque per-user identifier whose shape you must not assume.- Discovery is minimal: it carries what this client reads and no more. A
real document advertises
userinfo_endpoint,end_session_endpoint,claims_supportedand several*_supportedarrays; a client that grew to depend on one of them would pass here and fail against production. - Token response order and extras: real providers add
id_token,refresh_token,scopeand vendor claims, in no guaranteed order. Nothing may be asserted positionally. - Keys do not rotate and expiry is generous: no
kidrollover, no re-fetch on an unknownkid, no clock-skew edge. - No refresh, revocation or introspection endpoints exist, so no test here covers the paths that use them.
The same tests run against a real IdP with no code change. The provider is read entirely from configuration:
RPP_E2E_ISSUER=https://idp.example/realms/cosmon \
RPP_E2E_AUDIENCE=<the client_id registered there> \
RPP_E2E_IDP_SUB=<the sub that IdP mints for the test principal> \
RPP_E2E_EXPECT_SUB=<the same value> \
pytest tests/e2e -m stack
Two things must then be provisioned out of band: the JWKS the adapter pins
from disk must be that provider's (see the rpp-jwks volume in the compose
file), and the redirect URI http://127.0.0.1:7777/callback must be
registered on the client.
The tackle leg, and why it is the interesting one
The scenario ends by dispatching a real worker: tackle, then a wait for the
molecule to reach completed, then done.
That leg is worth more than the rest put together, because it is the one thing
no in-process test can tell you. Until issue #54, the adapter reached tackle,
run and the harvest door by running the cs binary, which its own Dockerfile has
never contained. Every unit and route suite was green; all three routes failed
against the image you actually deploy. The routes now dispatch in-process, and
this step is the only place that claim is checked where it matters: inside the
container, with a worker pane really opened, a git worktree really cut, and the
briefing really pasted into it.
The worker is a dummy, and it is not in the image you deploy.
deploy/docker-compose.e2e.yml builds the adapter from the Dockerfile's e2e
target, a FROM runtime layer that adds tests/fakes/fake-claude under the
name claude plus a worker-side cs, so the worker can finish its molecule.
The shipped stage still carries no cs and no agent CLI. A smoke that
provisioned the tenant-facing image would be proving the claim about an image
nobody runs.
The done leg must merge
done, restored as one gesture when issue #51 withdrew the second land verb,
is
where the walk ends, and what it asserts is a merge commit on the tenant's
base branch, carrying the lineage trailers cs done writes.
That is a change of verdict, and it took three issues. The door's decision half
runs in-process (#54), so every pre-effect refusal answers with no cs binary
present. The effect half became a library the adapter links, cosmon-harvest,
and the default (#67, #68). A stock deployment therefore reaches the real
transaction instead of a 501 harvest_effect_unavailable. The historical
container suite exercises the legacy sealed profile, with both conditions:
[harvest_authority] required = truein the throwaway galaxy. Without it, legacy remote harvest is disabled.- an operator-sealed, molecule-scoped grant, so the effect half admits too. An armed galaxy with no trust root refuses from inside the trunk lock.
The production path is the operator-side cosmon-remote harvest init and
harvest grant sequence above.
Two further tests pin the parameter surface the D4 reversal put on the wire: a
blank --reason is refused 400 missing_reason (the door never invents a
sentence), an unimplemented --strategy is refused 400 unsupported_parameter
rather than silently defaulted, and a second test set closes its molecule with
--no-merge and asserts the opposite verdict: a 200 reporting merged: false
with the base branch exactly where it was.
v1_done_library_effect.rs proves the same merge in-process, and much faster.
What the container adds is the only thing an in-process test cannot say: that it
happens through the image an operator deploys, on a bind-mounted tenant tree,
driven by the real cosmon-remote.
To watch the pre-issue-54 failure for yourself, point the build at a checkout that predates the cut-over and name the refusal you expect:
git worktree add /tmp/pre-u6 <commit-before-the-cut-over>
RPP_E2E_BUILD_ROOT=/tmp/pre-u6 \
RPP_E2E_E2E_STAGE=0 \
RPP_E2E_EXPECT_TACKLE_LABEL=tackle_unavailable \
  bash scripts/rpp-remote-e2e.sh
The tests that need a successful dispatch are then deselected. A refused dispatch has no worker to wait for, and the run records the refusal it observed. They are deselected rather than skipped: nothing in this suite prints green without having run.
The same entry point runs nightly in CI as the non-blocking rpp-remote-e2e
job, which uploads the JUnit report and the per-exchange artefacts.
See also
- Agent adapters: a harness over harnesses: how cosmon selects and runs an adapter.
- Control plane vs data plane: why artifact retrieval is separate from lifecycle control.
- Molecule lifecycle reference: lifecycle terms and commands in full.